Showing posts with label furniture. Show all posts

Saturday, March 24, 2012

My Home Office

This past summer we converted the guest room (actually more of a storage room) into my home office. It has been a slow process getting it to this point, but it is now one of my favorite spaces. I chose Martha Stewart's "Sharky Gray" for the wall color and added white furniture to keep the room light and airy. It is a fairly small room so the light colors helped in that respect as well. Since my business is in the wedding industry, I wanted it to have a soft, romantic feel but at the same time, I wanted to add a few fun quirky pieces since the rest of the house is pretty neutral colored. I am still new at the whole photography thing and this room was extremely hard to capture. I thought since I just got the camera, it would be a long time before I would see the need to purchase additional lenses. Definitely not the case. A wide angle lens would have made photographing this room a million times easier, but for now I made do with what I have. Anyways, welcome to my office!
I love that it is so feminine!
The pink drapes incorporate my company color.
Dogs (small breeds only) are always welcome in my office and can lay in the hot pink bed if they choose.
Monograms are my thing so of course my chair is no exception. The mirrored chest was a gift from the boyfriend and one of my favorite pieces of furniture. It adds the perfect amount of glam (and is a nice home for my printer).
I painted both of these pieces a while back but they really didn't fit with the rest of the house. I loved the bold black frame with the metallic giraffe paired with the soft abstract canvas. Then I added a pop of turquoise with the Kate Spade box, which belongs to a cake serving set, a vintage wedding cake topper, and a wedding etiquette book. Just keeping with the wedding theme.
I found this cute metal card holder at Staples to show off my pretty pink business cards.
I seriously wouldn't make it without my daily planner. I'm very pro-tchnology but some things just need to be written down. If it's not in my planner, it's not getting done.
My office is consumed with wedding magazines and these are some of my all time favorites.
My bulletin board was a little boring so I painted the edges gold to glam it up a bit. 
The old window showcases pictures from a few of my recent weddings. I used it for a bridal show and decided to keep it out for decor. I love using windows to display photos.
When I saw this Yorkie picture at Home Goods, it reminded me so much of my Presleigh. I also had to get the cute pink treat container. I told you, it's a pet-friendly place.
I had been wanting a leopard print rug to add a little sass to the room. I happened upon this one at Ross and it was dirt cheap and the perfect size.
I got this magazine holder at the thrift store and it was the perfect height for a little window seat. I added some faux fur material and it became Presleigh's favorite spot to sit while I work. She lets me know when we have visitors.

I hope you enjoyed the tour of my home office! Enjoy the weekend!

Desk- Ikea
Clear Chair- Ikea
Chair Cover- World Market
Chandelier- Ikea
Drapes- Target
Mirrored Chest- TJ Maxx
White Cabinets- Home Depot
Window Seat- Thrift Store/Faux Fur- Jo Ann Fabric/Pillow- Ross
Rug- Ross
Lamp- Old Time Pottery
Yorkie Framed Art- Home Goods/ Treat Container- Home Goods
Window- Antique Store

Monday, February 20, 2012

RH trunk copy cat

I have always loved the Aviator coffee table trunk from Restoration Hardware. I thought this piece would be perfect for an interior design project that I am working on, but with a price tag of over $1000 and the fact that it is no longer available, it wasn't an option. Instead I decided to try my hand at a DIY replica. I found an old foot locker at the thrift store for $9.99. The hardware was already a gold that was very similar to my Restoration Hardware inspiration. I taped over it so that it wouldn't be covered with paint. I used metallic silver spray paint to cover the rest of it (it was green before). When I removed the tape, I was so surprised at how similar it looked to the RH trunk. It is much smaller and is being used on the hearth, not as a coffee table, but I absolutely loved the end results. Now I want to do one for my own house but I get bored doing the same projects again and again, so we'll just have to see about that.

Restoration Hardware Aviator Coffee Table compared to DIY foot locker


Monday, June 6, 2011

Copycat Pottery Barn cube

Pottery Barn twill cube $99

Around Christmas time last year, I came across a twill cube ottoman in Pottery Barn. It wasn't anything eccentric or gorgeous, but its simplicity won me over and I almost bought the thing more than once. Thankfully I came to the conclusion that I didn't need to spend $100 on an oversized cube that I had no place for. 

Pottery Barn outdoor cube $159 $125

Over time, the perfect cube slipped my mind. That is until its outdoor twin debuted in the Spring Pottery Barn catalog. This one costing $159. I knew I wasn't going to make the purchase but that didn't stop me from dreaming about it. 

plush baby blocks

I'm usually always thinking of ways to make a copy-cat version of expensive items that I yearn for, but for some reason, it never crossed my mind that I could easily create a replica of the PB cushion. Then it hit me. When I was making the plush baby blocks for one of my friends who is expecting, I realized the blocks were tiny versions of my beloved cube. 

my copy-cat cube

A friend had given me a huge roll of canvas material, which happened to be the perfect color and texture. I wanted my cube to be pretty large so I cut six (20") squares of material, and six (20") squares of fusible interfacing material. I ironed a square of the interfacing material to each square of canvas to make the sides sturdy and give it a perfect cubed shape. Next I lined up the edges and sewed the right sides of the material together, until I had a cube with one side left unstitched. I stuffed it with tons and tons of polyfil. I'm really not sure how much it took because I used what I had around the house and then bought a 50 oz. bag to finish it off. Afterwards, I kind of wished I had monogrammed an "M" on one side and at some point I might un-stuff the thing and do that. Overall, it ended up costing me about $8 for the polyfil and I think it looks pretty similar to the Pottery Barn version. Now, I'm thinking about making one out of burlap.

my cube in the living room

Tip Junkie handmade projects

Tuesday, May 10, 2011

Restored Bedroom Suite

This post is exciting to me because it one that I have greatly anticipated. Most of my other projects have been completed within a week but this furniture make-over has taken a good bit of time. The general labor didn't take any longer than expected but with all the crazy weather in Alabama recently, I was constantly dragging these very heavy pieces to and from the garage. One of my mom's best friends had this antique dresser/mirror and bed in her basement and asked me if I would want to fix it up to sell. I had so many ideas and I was so excited to finally get to put them to use. While the furniture had a very pretty structure and elegant engraved detail, it was definitely in need of some work. 
The top had a laminate coating on parts of it so first off, that had to go.
The legs were part laminate as well so I removed it all.
I had never used an electric sander, and while it was much faster than a sanding block, the thing was quite powerful. After I got used to it, I decided it was definitely a tool that I would be using from now on.
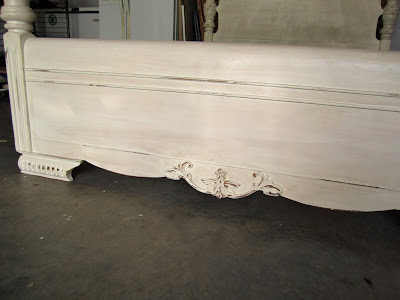
I decided to skip the pictures of the primer stage because primer just isn't all that pretty or interesting. I chose the base color to be a creamy white called "Woodlawn Lace" and then I added a brown glaze to accentuate the ornate detail. I used the electric sander again to distress the edges and then sealed the furniture with a polyurethane coating.
For the drawers, I wanted to add a stripe that was still in the neutral family but would create a soft contrast against the base color. I chose a shade called "Toasted Almond" which is a grayish/beige color. I felt that the stripes were defined, yet subtle. 
The little key hole adds such elegant charisma.
I really liked the original hardware because it shows the age of the furniture.
I just love how the combination of the glaze with the distressing brings out these details.
As much as I loved working on these pieces, I have to say the staging of the furniture was just as rewarding. What a fun job that would be!
Of course, Presleigh had to be part of the project too. She thought it would be a good selling factor.
Once everything was complete, I could really stand back and admire the bedroom suite. If only the bed were queen size, my current bedroom furniture would be for sale and this would be mine. My favorite part of the make-over would definitely be the dresser. I am in love with striped furniture and the simple colors are just my style. Now I'm on the lookout for a piece in my house that would be a good candidate for the same sort of striping action.